Classification of Flowers In Mobile Phone ( PART 3)
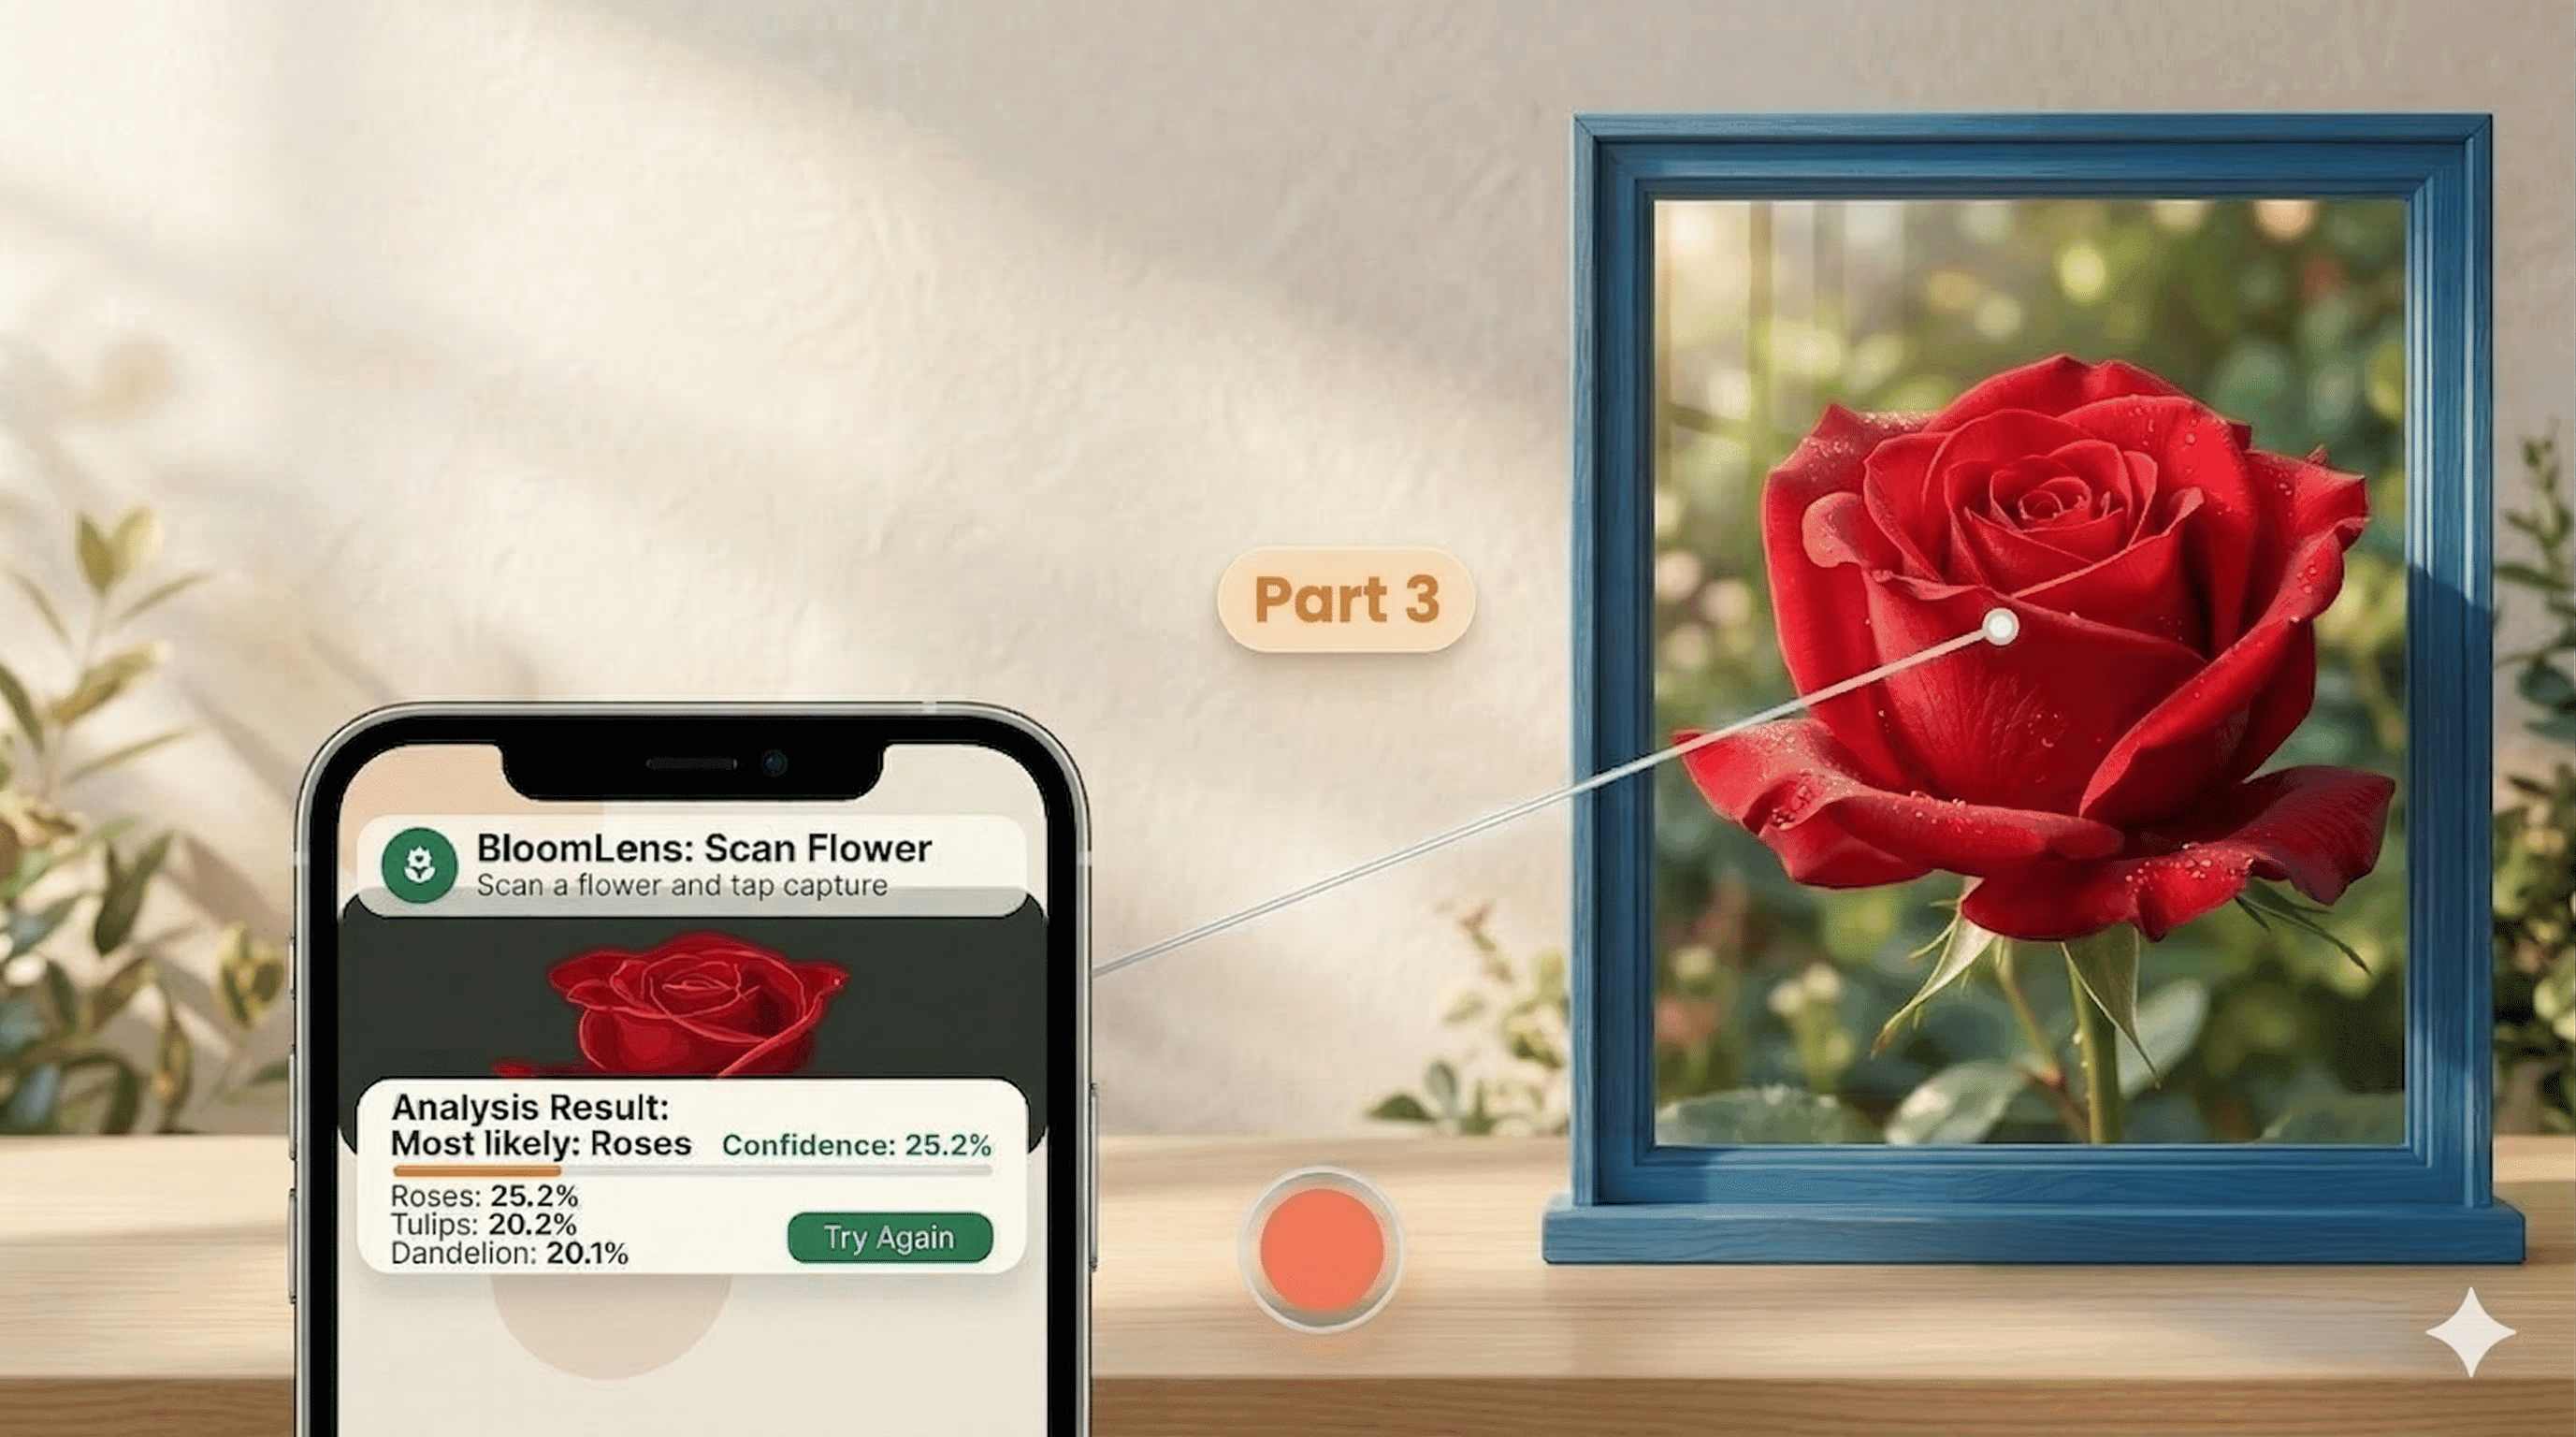
This guide is the practical Part 3: we will design and build a Flutter app that classifies flower images on-device using your trained TensorFlow Lite model.
You already trained the model in Python and exported it to model.tflite in Part 2 (with augmentation + dropout to reduce overfitting). Now we ship it into a real Android app with a clean architecture and modern UI.
Implementation status update (March 15, 2026): the app described in this post is now fully implemented in this repository, analyzed, tested, and built as a debug APK.
What We Are Building
A mobile app that:
- Opens the device camera
- Captures a flower photo
- Runs on-device classification with TensorFlow Lite (no internet required)
- Displays the top prediction and confidence with a polished, modern interface
It will look like this in your android phone:
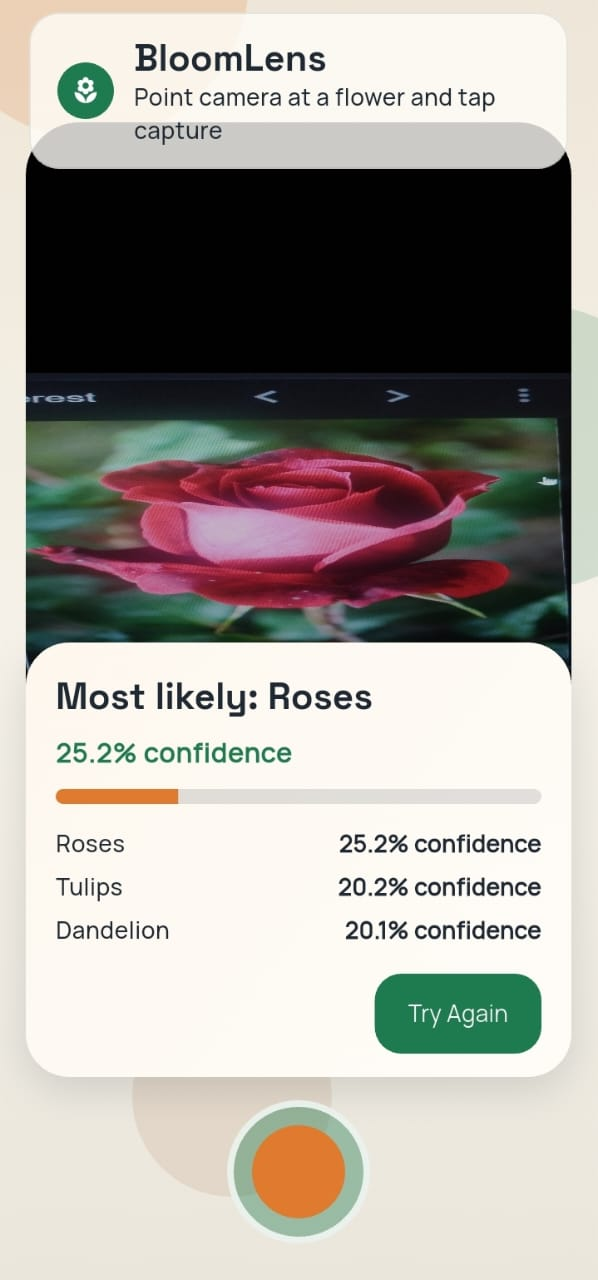 Image description
Assumptions
- Flutter is already installed on this laptop (as requested)
- You want Android deployment on a real phone over USB
- Your model file will be named
model.tflite
1. Architecture First
Before coding screens, lock in architecture. This avoids a messy "everything in one widget" app.
1.1 Architecture Goals
- Fast inference on mid-range Android phones
- Clear separation between UI, camera, and ML logic
- Easy to swap model/labels later
- Easy to test domain logic without camera hardware
1.2 Layered + Feature-First Structure
Use a lightweight Clean Architecture style:
- Presentation: widgets, state, view models/controllers
- Domain: entities + use cases (
ClassifyFlowerImage) - Data: camera bridge + TFLite repository implementation
- Core: theme, constants, utility functions
1.3 Data Flow
1.4 Suggested Project Tree
flower_app/
  android/
  assets/
    ml/
      model.tflite
      labels.txt
  lib/
    main.dart
    src/
      app.dart
      core/
        constants/
          model_constants.dart
        theme/
          app_theme.dart
        util/
          math_utils.dart
      features/
        classify/
          domain/
            entities/
              flower_prediction.dart
            repositories/
              flower_classifier_repository.dart
            usecases/
              classify_flower_image.dart
          data/
            tflite_flower_classifier.dart
          presentation/
            controllers/
              classify_controller.dart
            pages/
              camera_classify_page.dart
            widgets/
              prediction_card.dart
This structure keeps model logic out of widgets and makes future upgrades easy.
2. Environment Setup (Android Studio on Windows)
Flutter is already installed, so this section focuses on Android tooling.
2.1 Install Android Studio
- Download Android Studio from the official site.
- Run installer with defaults.
- Open Android Studio once and complete the setup wizard.
- Install these SDK components:
- Android SDK Platform (latest stable)
- Android SDK Platform-Tools
- Android SDK Build-Tools
- Android Emulator (optional if you use real device only)
- Android SDK Command-line Tools
2.2 Configure SDK in Android Studio
- Open Android Studio.
- Go to
More Actions > SDK Manager. - In
SDK Platforms, install a stable API level (for example API 34 or newer). - In
SDK Tools, ensureAndroid SDK Platform-Toolsis checked.
2.3 Windows USB Driver Notes
If your phone is not recognized by adb:
- Install OEM USB drivers (Samsung/Xiaomi/Oppo/etc.)
- Or install Google USB Driver from SDK Manager
- Reconnect cable and try a different USB port
3. Real Device Setup (Developer Options + USB)
This is the step most people miss.
3.1 Enable Developer Options
- Open phone
Settings. - Open
About phone. - Tap
Build number7 times. - Enter PIN if prompted.
- You should see: "You are now a developer".
3.2 Enable USB Debugging
- Go to
Settings > Developer options. - Turn on
USB debugging. - Optional but useful:
- Enable
Stay awakewhile charging - Set
Default USB configurationtoFile Transfer(or MTP)
- Enable
3.3 First USB Authorization
- Connect phone with data-capable USB cable.
- Accept the pop-up:
Allow USB debugging?. - Check
Always allow from this computer.
3.4 Verify Device Connection
adb devices
Expected: device appears as device (not unauthorized).
4. Create Flutter App and Add Model
From terminal:
flutter create flower_app
cd flower_app
mkdir assets\ml
Copy your model into:
assets/ml/model.tflite
If your current file is named FlowerModel.tflite, rename while copying to model.tflite.
Create labels file:
assets/ml/labels.txt
Example labels for the classic flowers dataset:
daisy
dandelion
roses
sunflowers
tulips
5. Add Dependencies
In pubspec.yaml:
dependencies:
  flutter:
    sdk: flutter
  camera: ^0.11.0+2
  tflite_flutter: ^0.11.0
  image: ^4.5.4
  flutter_riverpod: ^2.6.1
  google_fonts: ^6.3.2
  permission_handler: ^12.0.1
Also add assets:
flutter:
  assets:
    - assets/ml/model.tflite
    - assets/ml/labels.txt
Then run:
flutter pub get
6. Android Permissions
Update android/app/src/main/AndroidManifest.xml:
<uses-permission android:name="android.permission.CAMERA" />
<uses-feature android:name="android.hardware.camera" android:required="true" />
If needed, ensure minSdkVersion is at least 21 in your app Gradle config.
7. Core Domain and ML Inference
7.1 Prediction Entity
class FlowerScore {
  const FlowerScore({required this.label, required this.confidence});

  final String label;
  final double confidence;
}

class FlowerPrediction {
  const FlowerPrediction({required this.best, required this.ranked});

  final FlowerScore best;
  final List<FlowerScore> ranked;

  String get label => best.label;
  double get confidence => best.confidence;
}
7.2 Repository Contract
abstract class FlowerClassifierRepository {
  Future<void> load();
  Future<FlowerPrediction> classifyImage(Uint8List imageBytes);
  void close();
}
7.3 Softmax Helper
import 'dart:math' as math;

List<double> softmax(List<double> logits) {
  if (logits.isEmpty) {
    return const <double>[];
  }

  final maxLogit = logits.reduce(math.max);
  final exps = logits.map((v) => math.exp(v - maxLogit)).toList();
  final sum = exps.fold<double>(0, (prev, item) => prev + item);
if (sum == 0) {
return List
return exps.map((e) => e / sum).toList(growable: false); }
### 7.4 TFLite Classifier Implementation

```dart
import 'dart:typed_data';
import 'package:flutter/services.dart' show rootBundle;
import 'package:image/image.dart' as img;
import 'package:tflite_flutter/tflite_flutter.dart';

class TfliteFlowerClassifier implements FlowerClassifierRepository {
  Interpreter? _interpreter;
  late final List<String> _labels;
  late final int _inputHeight;
  late final int _inputWidth;
  late final TensorType _inputType;
  late final TensorType _outputType;

  bool get _expectsUint8Input => _inputType == TensorType.uint8;

  @override
  Future<void> load() async {
    _interpreter = await Interpreter.fromAsset('assets/ml/model.tflite');

    final inputShape = _interpreter!.getInputTensor(0).shape;
    _inputHeight = inputShape[1];
    _inputWidth = inputShape[2];
    _inputType = _interpreter!.getInputTensor(0).type;
    _outputType = _interpreter!.getOutputTensor(0).type;

    _labels = (await rootBundle.loadString('assets/ml/labels.txt'))
        .split(RegExp(r'\r?\n'))
        .map((line) => line.trim())
        .where((line) => line.isNotEmpty)
        .toList(growable: false);
  }

  @override
  Future<FlowerPrediction> classifyImage(Uint8List imageBytes) async {
    final decoded = img.decodeImage(imageBytes);
    if (decoded == null) {
      throw Exception('Could not decode image');
    }

    final resized = img.copyResize(
      img.bakeOrientation(decoded),
      width: _inputWidth,
      height: _inputHeight,
      interpolation: img.Interpolation.cubic,
    );

    // Keep this false when model already has Rescaling(1./255) inside.
    const applyInputNormalization = false;
    final scale = applyInputNormalization ? (1.0 / 255.0) : 1.0;

    final input = List.generate(
      1,
      (_) => List.generate(
        _inputHeight,
        (y) => List.generate(
          _inputWidth,
          (x) {
            final p = resized.getPixel(x, y);
            final r = p.r.toDouble() * scale;
            final g = p.g.toDouble() * scale;
            final b = p.b.toDouble() * scale;
            return [r, g, b];
          },
          growable: false,
        ),
        growable: false,
      ),
      growable: false,
    );

    final output = [List<double>.filled(_labels.length, 0)];
    _interpreter!.run(input, output);

    // Training exported logits, so convert to probabilities in app.
    final probs = softmax(output.first);

    final ranked = List<FlowerScore>.generate(
      _labels.length,
      (i) => FlowerScore(label: _labels[i], confidence: probs[i]),
      growable: false,
    )..sort((a, b) => b.confidence.compareTo(a.confidence));

    final top3 = ranked.take(3).toList(growable: false);
    return FlowerPrediction(best: top3.first, ranked: top3);
  }

  @override
  void close() {
    _interpreter?.close();
  }
}
Important: keep preprocessing identical to training assumptions:
- RGB channel order
- Correct input width/height
- If training model already contains
Rescaling(1./255), do not divide by255.0again in app code - Apply softmax in app when model output is logits
8. State Management (Riverpod)
Use one controller for loading/classifying/error state.
sealed class ClassifyState {
  const ClassifyState();
}

class ClassifyIdle extends ClassifyState {
  const ClassifyIdle();
}

class ClassifyLoading extends ClassifyState {
  const ClassifyLoading();
}

class ClassifySuccess extends ClassifyState {
  final FlowerPrediction prediction;
  const ClassifySuccess(this.prediction);
}

class ClassifyError extends ClassifyState {
  final String message;
  const ClassifyError(this.message);
}
Controller responsibilities:
- Initialize model once on app start
- Receive captured image bytes
- Call classify use case
- Emit new state for the UI
9. Modern UI Design Direction
Avoid plain default Material look. Give the app a clear visual identity.
9.1 Visual Language
- Typeface:
Space Groteskfor headings,Manropefor body - Palette:
- Canvas:
#F5F1E8 - Surface:
#FFFDF8 - Primary:
#1E7A4F - Accent:
#E07A2E - Text:
#1F2933
- Canvas:
- Rounded cards (
20-28radius), soft shadows, glass-like overlays - Background gradient + soft radial blobs for depth
9.2 Layout
- Full-screen camera preview
- Top translucent app bar
- Bottom floating result card
- Large shutter button centered
- Confidence shown as animated progress bar
9.3 Theme Snippet
ThemeData buildAppTheme() {
  final base = ThemeData.light();
  return base.copyWith(
    scaffoldBackgroundColor: const Color(0xFFF5F1E8),
    colorScheme: ColorScheme.fromSeed(
      seedColor: const Color(0xFF1E7A4F),
      brightness: Brightness.light,
    ),
    textTheme: GoogleFonts.manropeTextTheme(base.textTheme),
    cardTheme: const CardThemeData(
      color: Color(0xFFFFFDF8),
      elevation: 2,
      margin: EdgeInsets.zero,
      shape: RoundedRectangleBorder(
        borderRadius: BorderRadius.all(Radius.circular(24)),
      ),
    ),
  );
}
10. Camera Screen Behavior
Workflow:
- Open back camera preview
- User taps capture
- Show loading state for 100-300 ms
- Run inference
- Show result card:
- Predicted class (example:
sunflowers) - Confidence (example:
91.2%) - Optional top-3 list
- Predicted class (example:
Try Againbutton returns to preview
11. Wire App Entry
main.dart should initialize dependencies early:
- Ensure Flutter bindings initialized
- Create/load classifier repository
- Inject repository via Riverpod providers
- Start app
Pseudo entry flow:
Future<void> main() async {
  WidgetsFlutterBinding.ensureInitialized();

  final classifier = TfliteFlowerClassifier(
    modelAssetPath: ModelConstants.modelAssetPath,
    labelsAssetPath: ModelConstants.labelsAssetPath,
    applyInputNormalization: ModelConstants.applyInputNormalization,
    outputIsLogits: ModelConstants.outputIsLogits,
    inferenceThreads: ModelConstants.inferenceThreads,
  );

  await classifier.load();

  runApp(
    ProviderScope(
      overrides: [
        flowerClassifierRepositoryProvider.overrideWithValue(classifier),
      ],
      child: const FlowerLensApp(),
    ),
  );
}
12. Run on Real Phone
- Connect USB cable
- Confirm debugging authorization prompt on phone
- Run:
flutter run
If multiple devices:
flutter devices
flutter run -d <device-id>
13. Debugging Checklist
If app fails to classify correctly:
- Verify label order in
labels.txtexactly matches training class index order - Verify model input size from interpreter tensor shape
- Verify normalization settings and RGB ordering match training (for this model, keep
applyInputNormalization = false) - Verify model asset path is correct in
pubspec.yaml - Log raw logits once to inspect suspicious outputs
If camera does not open:
- Recheck camera permission in manifest
- Confirm runtime permission granted
- Close other camera apps that may lock the camera
If adb devices shows unauthorized:
- Revoke USB debugging authorizations on phone
- Reconnect cable and accept prompt again
14. Performance Notes
- Keep interpreter loaded for app lifetime (do not recreate per capture)
- Reuse buffers where possible for lower GC pressure
- For smoother UX, run heavy preprocessing in an isolate
- If model is heavy, consider int8 quantization in a later iteration
15. Why This Architecture Works
- UI remains responsive because ML logic is separated from widgets
- Domain layer makes classification logic testable without camera
- Data layer encapsulates TFLite details, so model upgrades are localized
- Feature-first folders keep code maintainable as app grows
16. Production Improvements (Next Steps)
- Add top-3 predictions and confidence bars
- Add gallery image classification (not only camera)
- Add offline prediction history screen
- Add model metadata parser for automatic labels/input shape
- Add integration tests on physical device farm
17. Build Verification (This Repository)
The implementation in this repo has been verified with:
flutter analyze
flutter test
flutter build apk --debug
Current result:
flutter analyze: no issues foundflutter test: all tests passedflutter build apk --debug: success- APK output:
build/app/outputs/flutter-apk/app-debug.apk
Final Wrap-Up
You now have an end-to-end plan and implementation blueprint for a modern Flutter flower classification app:
- Android environment ready
- Real device configured through Developer Options and USB debugging
- TFLite model integrated in app assets
- Camera capture + on-device inference pipeline defined
- Modern UI direction and architecture locked in
With this structure, you can start coding immediately and scale cleanly from MVP to production.
That's complete the series of this particular blog. I hope you are learning so much from these blogs. If you don't want to miss the future blogs please make sure to subscribe to my newsletter.
Reading progress
0% read
Auto-completes after you reach the end and linger for a moment.
You made it to the end
Get more like this in your inbox
Every week I write about machine learning, engineering patterns, and things I'm building. Practical, no fluff — straight to your inbox.
Subscribe to the newsletter
Get thoughtful updates on AI, engineering, and product work.