Part 2: Building FileSage MCP — A Production-Grade File Intelligence Server
If you read Part 1, you know the theory cold. You know why MCP exists, you understand the Host-Client-Server separation, you can explain the initialization handshake, tools, resources, roots, sampling etc. That was the mental model.
Part 2 is the payoff. We're building a real server, start to finish, and we're not skipping anything.
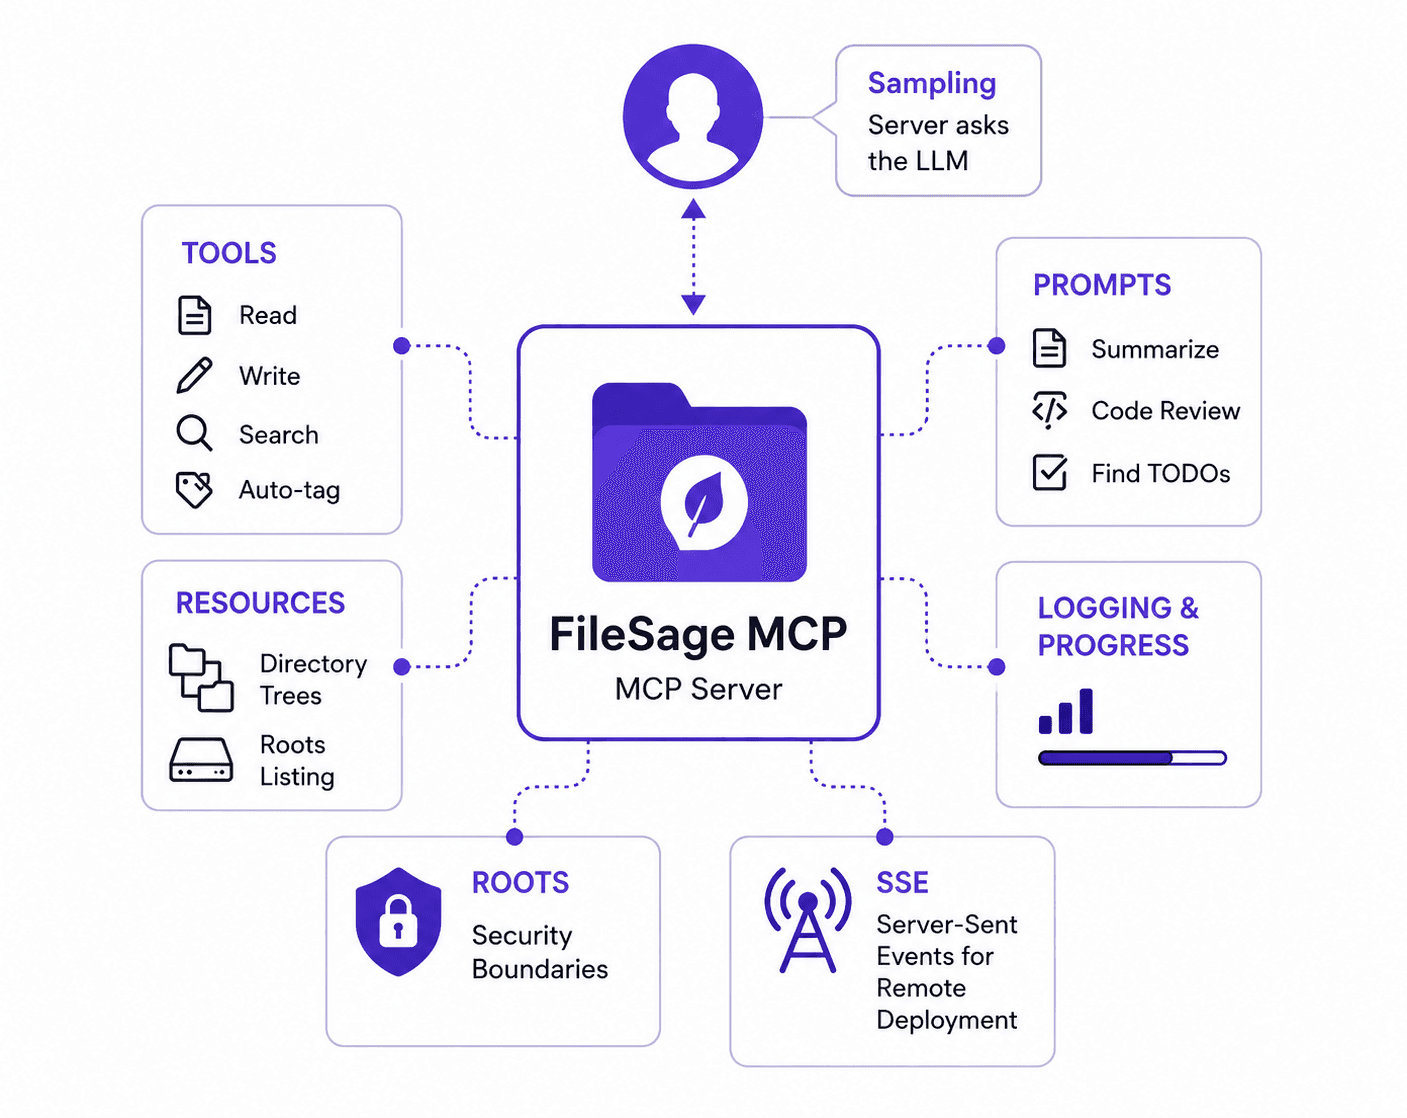
We're building: FileSage MCP: an intelligent file system server that gives Claude secure, structured access to your local filesystem. It's practical enough to actually use and comprehensive enough to demonstrate every single MCP feature.
By the end, you will have written or touched:
- Tools (read, write, search, scan, auto-tag)
- Resources (directory trees, roots listing)
- Prompts (summarize, code review, find todos)
- Logging & Progress notifications
- Roots for security boundaries
- Sampling (the server asking the LLM)
- SSE for remote deployment
Let's dive into the architecture.
Project Structure
The first architectural decision is where things live. A monolithic server file that grows to 400 lines is fine for demos, but it becomes hard to navigate fast. We split by responsibility:
📁 FILESAGE_MCP
├── 📄 main.py               # Application Entrypoint & CLI Orchestrator
├── 📄 mcp_client.py         # MCP Client Lifecycle & Roots Injector
├── 📄 mcp_server.py         # Light Server Bootstrapper
├── 📄 pyproject.toml        # Project Dependencies & Metadata
└── 📁 core/                 # The Application Brains
    ├── 📄 server.py         # Shared FastMCP Instance
    ├── 📄 tools.py          # Action Layer (@mcp.tool)
    ├── 📄 resources.py      # Context Data Layer (@mcp.resource)
    ├── 📄 prompts.py        # Static Templates (@mcp.prompt)
    ├── 📄 security.py       # Path Validation & Firewall Guard
    ├── 📄 utils.py          # Path and URI Parsing Helpers
    ├── 📄 openai.py         # OpenAI Provider Adaptor
    ├── 📄 claude.py         # Anthropic Provider Adaptor + Sampling Callback
    ├── 📄 chat.py           # Core Agentic Message Loop
    ├── 📄 cli_chat.py       # Terminal Chat Loop Subclass
    └── 📄 tool_manager.py   # MCP Tool to LLM Schema Translator
The key insight is core/server.py. It holds the single FastMCP instance. Every other module imports mcp from there and registers its handlers with decorators. mcp_server.py itself becomes nearly empty it just imports the modules to trigger registration, then calls mcp.run().
# mcp_server.py — entry point only
import sys
from core.server import mcp

import core.tools
import core.resources
import core.prompts

if __name__ == "__main__":
    transport = sys.argv[1] if len(sys.argv) > 1 else "stdio"
    if transport == "sse":
        mcp.run(transport="sse", host="0.0.0.0", port=8000)
    else:
        mcp.run(transport="stdio")
And core/server.py is just two meaningful lines:
from mcp.server.fastmcp import FastMCP
mcp = FastMCP("FileSage", log_level="ERROR")
The log_level="ERROR" matters. If FastMCP logs at DEBUG or INFO, it writes to stdout, which corrupts the JSON-RPC stream on stdio transport. Set this explicitly on every server you build.
Find Source Code: https://github.com/BhimPrasadAdhikari/filesage-mcp
Set it up with:
cp .env.example .env   # add your ANTHROPIC_API_KEY
pip install -r requirements.txt
python main.py ~/your-project-dir
1. Tools
In Part 1 we said tools are functions the LLM autonomously decides to call. They have side effects. They act on the world. Writing a good tool is three things: a clear name, an honest description, and tight type hints. The SDK does the rest.
FileSage defines five tools. Let's look at read_file tool:
Code walkthrough
2. Resources
Resources are the data layer. No side effects, no mutations — just structured context the LLM can read before deciding what to do. Think of them as your server's GET endpoints, addressed by URI.
FileSage's two resources live in core/resources.py. The tree resource is the more instructive one:
Code walkthrough
The naming distinction matters and is worth internalising: if Claude needs to understand something before acting -> read a resource. If Claude needs to change something -> call a tool. Keep this line clean and your architecture stays coherent.
3. Prompts
As discussed earlier, they're slash commands. User selects one, fill the arguments, and host constructs the opening message of conversation using your templates. Not autonomous. User triggers them when they want to use it.
All three prompts live in core/prompts.py and follow the same pattern: a Python function that takes string arguments and returns a formatted string.
Code walkthrough
The client reads these via session.list_prompts() and session.get_prompt("code_review", {"file_path": "/path/to/file.py"}). In the FileSage CLI, typing /prompts lists them all.
4. Logging and Progress Notifications
When a tool does something that takes time, we don't make the user stare at silence. MCP has built-in support for real-time log messages and progress notifications. Let's look at the code below:
Code walkthrough
Above both log and notification are fire-and-forget from the server's perspective. The server emits, the client handles the rest.
5. Roots
This is the feature that makes the MCP server secure. Without it, Claude can access your whole filesystem without your permission.
As discussed earlier, roots are directory path the client passes to the server during initialization. Server validates every filesystem path against them. The guard code is in core/security and is called at the tip of every tool and resource that touches disk.
Code walkthrough
The rule is simple: every tool and resource that reads or writes a path must call is_path_allowed() before doing anything. If you add a new tool, you must call this method.
6. Sampling Server asking the LLM
This is where MCP gets interesting. The flow normally goes: Client → server. Sampling reverses it. The server asks the Client to invoke the LLM on its behalf, and the result comes back through the same channel.
We need it to make our tool auto_tag_file() intelligent to tag the files and tagging is better done by a LLM than by keyword matching. So the server needs this feature. Let's look at the code:
Sampling code walkthrough
Code walkthrough
For sampling to work, the sampling_callback must be wired to the ClientSession. In FileSage, core/cli_chat.py does this after the session is initialized. Like this:
# core/cli_chat.py

def _wire_sampling_callback(self) -> None:
    session: ClientSession = self.filesage_client.session()
    session._sampling_callback = self.claude_service.sampling_callback
This is the step most people miss when first implementing sampling. The server-side
create_message()call will hang or error if no callback is registered.
7. SSE Deploying to a Remote Server
Everything so far runs over stdio. The server is subprocess on your local machine. That's the right default for personal use. But if you want a team to share a FileSage instance running on a remote server, you need HTTP.
The switch is single transport argument wired in mcp_server.py
Code walkthrough
# Start in SSE mode
python mcp_server.py sse
# Listening on http://0.0.0.0:8000
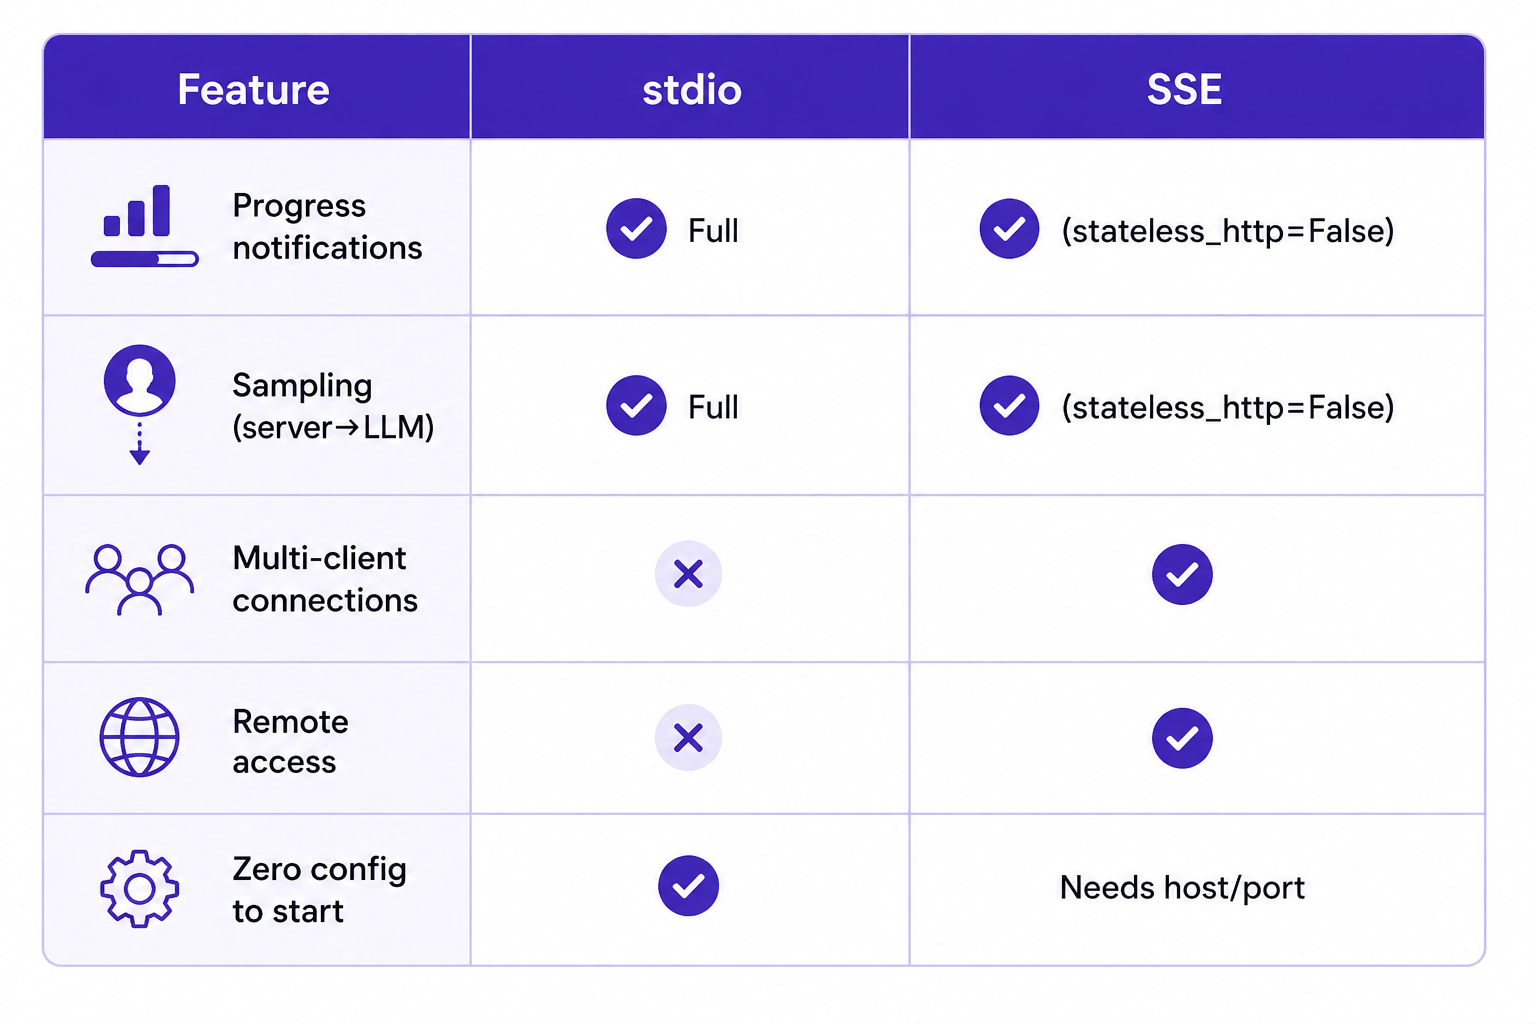
One gap from part 1 worth repeating here:
stateless_http=Trueorjson_response=Truebreaks progress notifications and sampling. If you're deploying via SSE and need those features, keep both settings at their defaults. Conclude from this capability comparison & choose what's best for your business needs.
 ## Wiring It all Together
Here's the complete call chain so you can see how every piece connects before you run it:
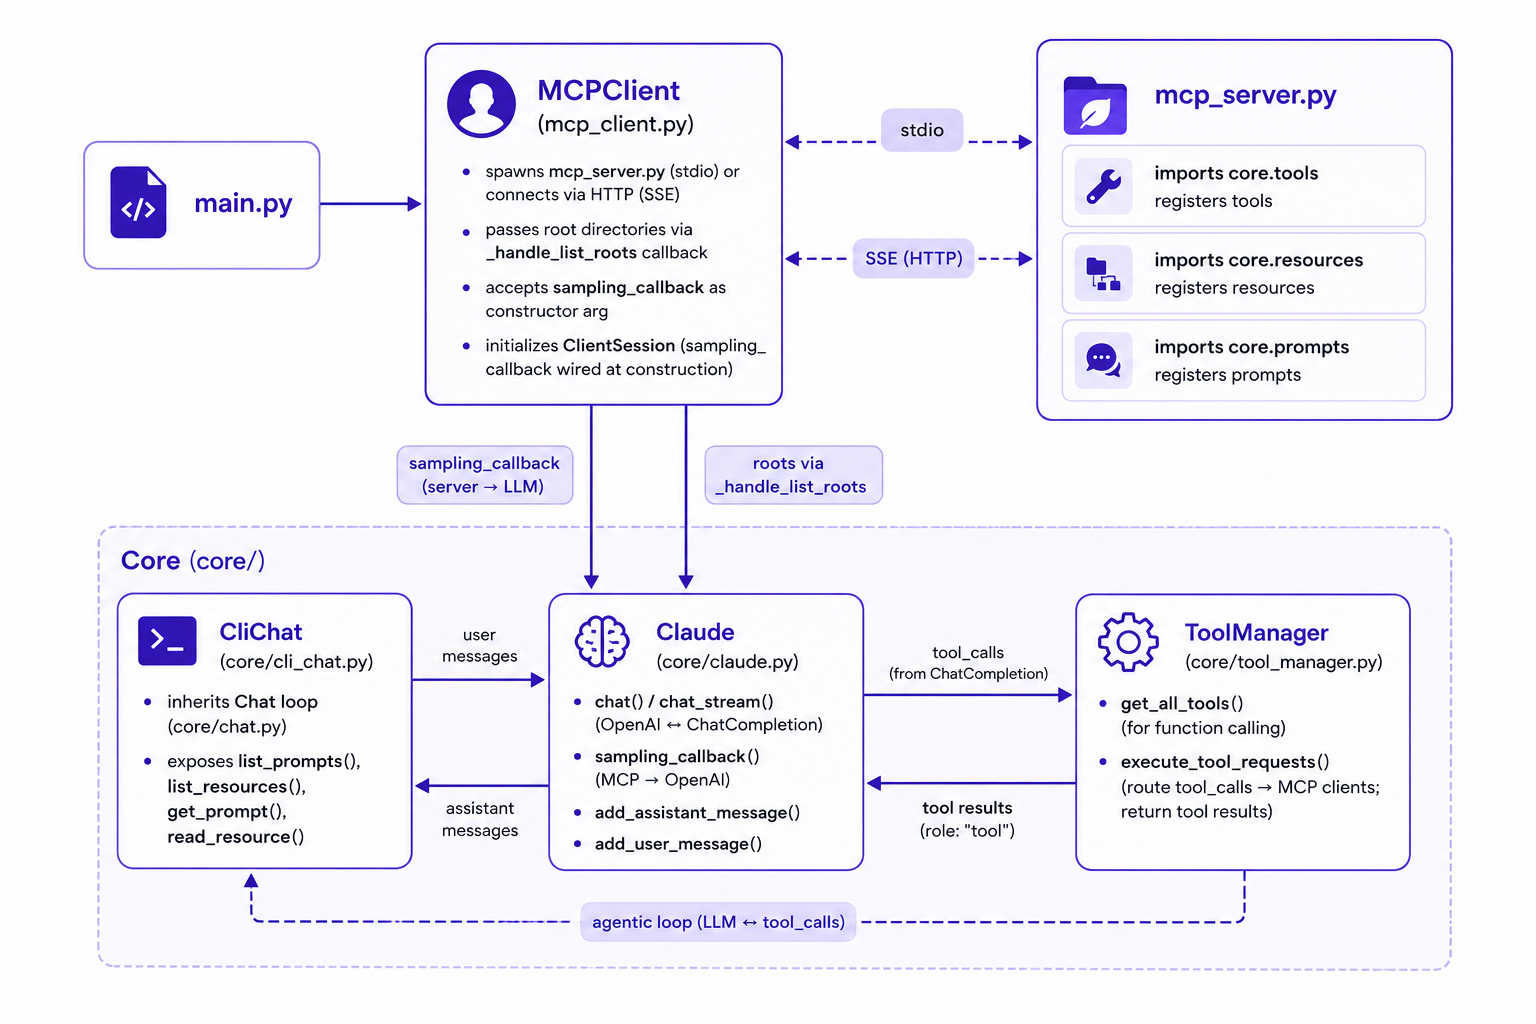 Now, to run it:
python main.py ~/your-directory-path ~/your-notes
Then you can ask it things like:
what files are in this directory?
search for TODO comments in *.py files
summarize the notes.txt file.
auto-tag the files listed in the folder.

Access prompts with /prompts.

You can do more with it. Read the Readme file for more detail use cases.
Wrapping it up
We built a real, production ready MCP server from scratch - not a normal trendy demo. A real server with secure codes, real-time progress feedback, intelligent tools and much more. We implement all 7 features of MCP server. Even implemented a client to interact with the server.
Every one of the features had a natural reason to exists in this project. So pay attention to each files code. My design principle is simple: "Don't add a feature to demonstrate it. Add it because the problem demands it. "
The full code for this project is on GitHub. View Code
Thanks for staying till the end. Hats off to your dedication to learn this tech to be competitive in today's fast growing job market. In part 3, we will go deeper on the agentic loop such as handling multi-step reasoning, context window management across long tool chains, and testing our MCP server in isolation. Subscribe if you don't want to miss it.
Reading progress
0% read
Auto-completes after you reach the end and linger for a moment.
You made it to the end
Get more like this in your inbox
Every week I write about machine learning, engineering patterns, and things I'm building. Practical, no fluff — straight to your inbox.
Subscribe to the newsletter
Get thoughtful updates on AI, engineering, and product work.